
Spend wallet balances using a card
You can issue a virtual or physical card that spends directly from a Bridge-managed wallet or external crypto wallet. Here's how to set that up.
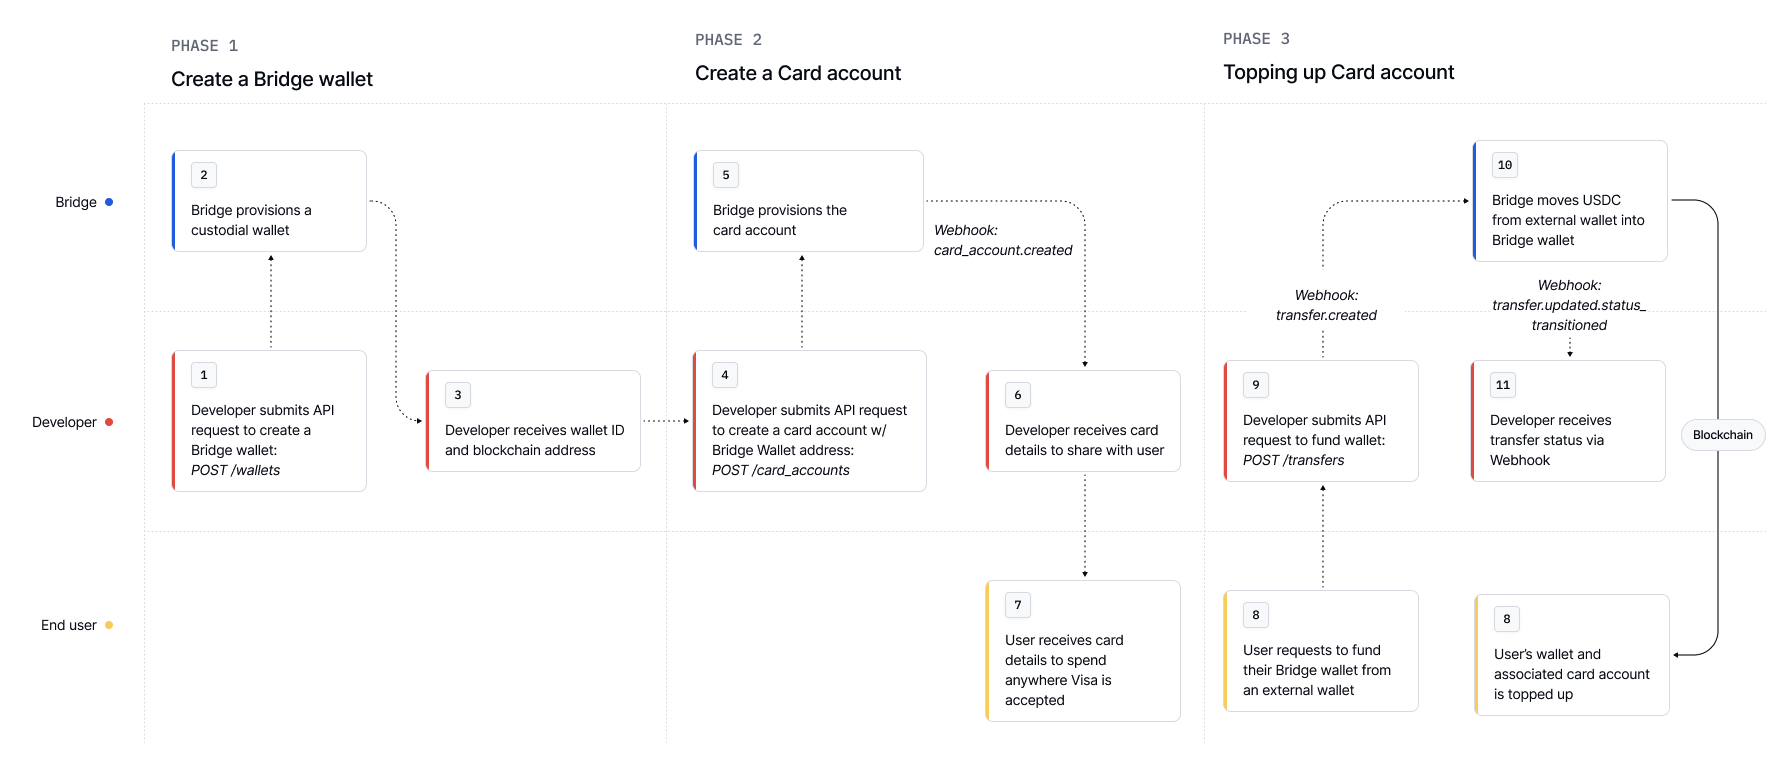
Step 1: Prepare a Bridge wallet
Create a wallet
First, create a Bridge wallet (optional if you're using an external wallet). Use the wallet’s address when issuing a card.
Request
curl --request POST \
  --url https://api.bridge.xyz/v0/customers/<customer_id>/wallets \
  --header 'Api-Key: <API Key>' \
  --header 'Idempotency-Key: <idempotency-key>' \
  --header 'Content-Type: application/json' \
  --data '{
    "chain": "solana"
  }'
Response
{
  "id": "wallet_abc123",
  "address": "4oG1sWkP8vcrnhbkzZc1m9RTT2VUjZHKx92qiVFK7FuZ",
  "chain": "solana"
}
Keep note of the wallet ID and address as you will need this in the next step.
Fund the wallet
The below example uses Bridge's transfer API to fund the wallet. There are a variety of methods to fund the wallet using Bridge's orchestration APIs (virtual accounts, transfers, or liquidation addresses). Learn more at Bridge Wallets.
Request
curl --location --request POST 'https://api.bridge.xyz/v0/transfers' \
--header 'Api-Key: <API Key>' \
--header 'Idempotency-Key: <Unique Idempotency Key>' \
--data-raw '{
  "on_behalf_of": "cust_alice",
  "source": {
    "payment_rail": "ach_push",
    "currency": "usd",
  },
  "destination": {
     "payment_rail": "solana",
     "currency": "usdb",
     "bridge_wallet_id": "wallet_abc123"
     }
     "features": {
       "flexible_amount": true // allows for any deposit amount
 		 }
}'
Step 2: Provision a card
Now create a card account tied to a Bridge wallet.
Request
curl --request POST \
     --url https://api.bridge.xyz/v0/customers/customerID/card_accounts \
     --header 'accept: application/json' \
     --header 'content-type: application/json' \
     --data '{
  "currency": "usdb",
  "chain": "solana",
  "crypto_account": {
    "type": "bridge_wallet",
    "address": "4oG1sWkP8vcrnhbkzZc1m9RTT2VUjZHKx92qiVFK7FuZ"
  }
}'
Retrieve card details
Access card metadata, expiration, and access a secure image of the card.
curl -X GET 'https://api.bridge.xyz/v0/customers/<customerID>/card_accounts/<cardAccountID>' \
--header 'Api-Key: <API Key>'
Sample response:
{
  "id": "XXX-YYY",
  "status": "active",
  "card_image_url": "https://...",
  "card_details": {
    "last_4": "1264",
    "expiry": "10/24",
    "bin": "44325280"
  }
}
💳 You can now share these card details with your customer to start spending!
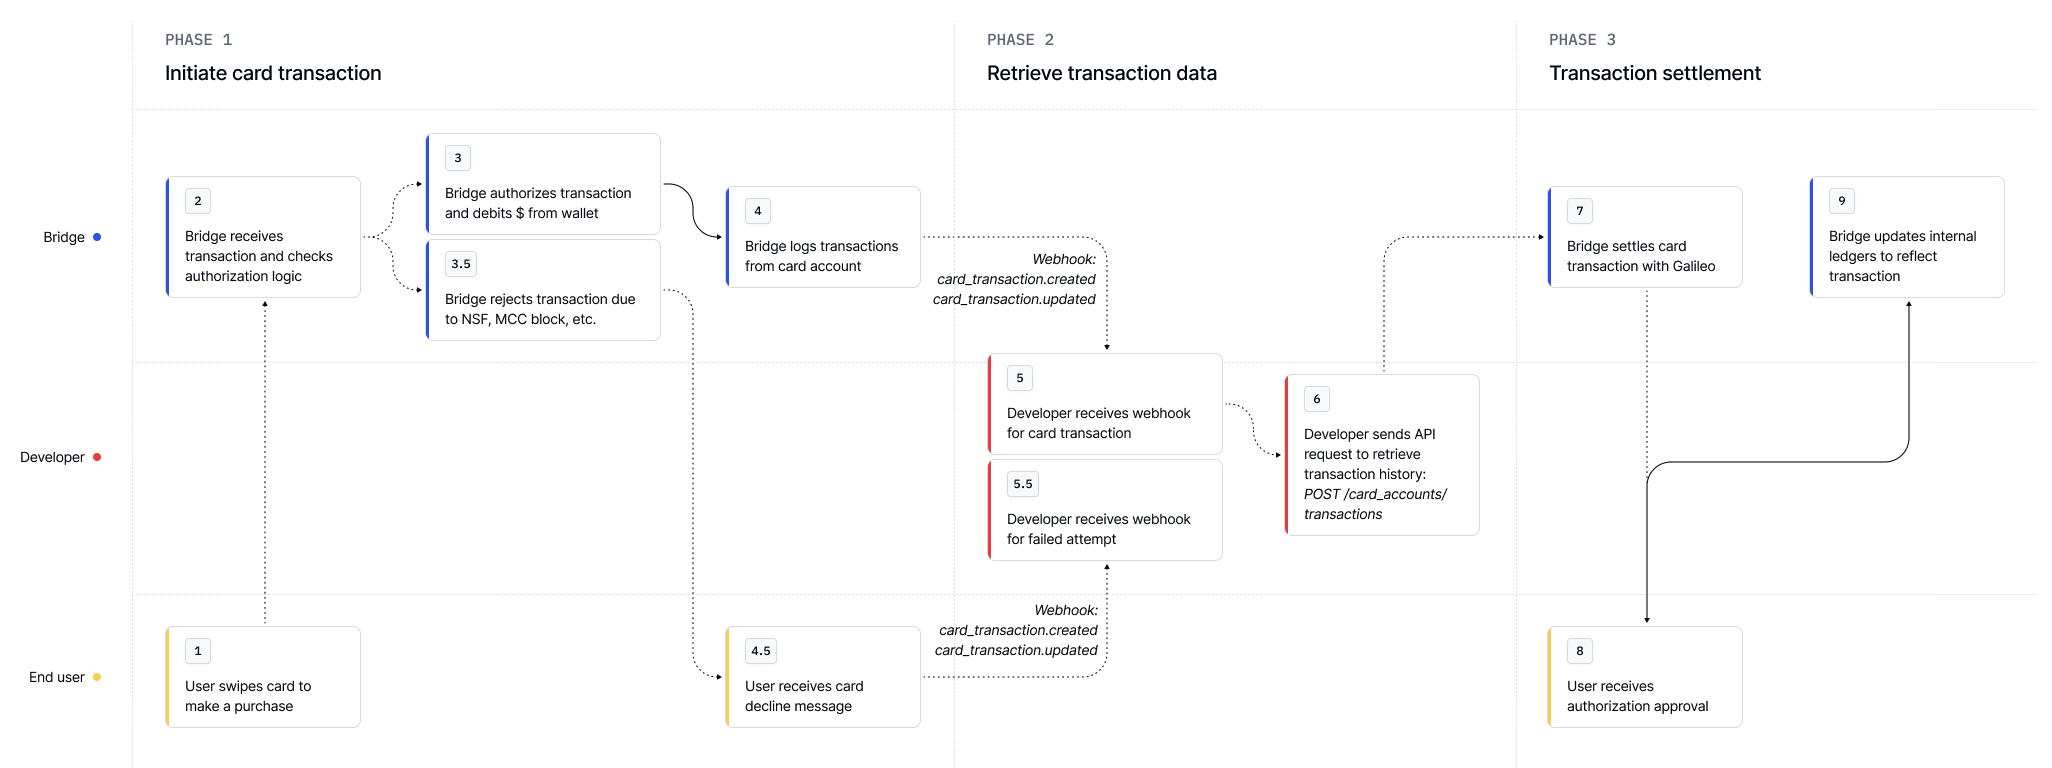
Step 3: Make a transaction
Now that you have the details for your card, you can use it to make transactions! Use your Bridge issued card like any normal card in e-commerce checkout flows.
Step 4: Monitor transactions
Subscribe to the card_transaction.created webhook to see newly created transactions.
{
  "event_type": "card_transaction.created",
  "event_object": {
    "status": "approved",
    "amount": "-10.25",
    "merchant_name": "ROCKET RIDES",
    "authorized_at": "2025-02-04T05:19:25.000Z"
  }
}
Subscribe to the card_transaction.updated.status_transitioned webhook to see settled transactions.
{
  "event_type": "card_transaction.updated.status_transitioned",
  "event_object": {
    "status": "settled",
    "settled_amount": "-10.25",
    "posted_at": "2025-02-06T03:01:30.000Z"
  },
  "event_object_changes": {
    "status": ["approved", "settled"],
    "settled_amount": [null, "-10.25"],
    "posted_at": [null, "2025-02-06T03:01:30.000Z"]
  }
}
Or you can fetch transactions manually via the Retrieve card transactions API.
Money Movement Overview
Resources
Check out the Cards section for more in depth details!
Updated about 4 hours ago