
Create your first customer
This guide walks you through creating your first customer using Bridge's API. Whether you want a fast start with a hosted KYC flow or prefer full control via API integration, this guide covers both options with clear examples in curl.
Prerequisites
Before you begin, ensure you have:
- A Bridge account with API access
- Your API key (keep this secure!)
- A working development environment
- Basic familiarity with REST APIs and JSON
What Is a Bridge Customer?
Bridge customers represent users of your business who can send and receive money. There are two types:
- Individual customers: Personal users with personal information
- Business customers: Companies with business information and beneficial owners
Key Terms
- KYC (Know Your Customer): Identity verification process required for compliance
- Endorsements: Approval for specific payment rails (USD, EUR, MXN)
- Terms of Service: Legal agreement customers must accept
👉 More about customers here: Customers
Method 1: Using KYC Links (Quick Start - Recommended)
Bridge provides a hosted onboarding flows so you don’t have to build your own KYC UI. This is the fastest way to onboard customers.
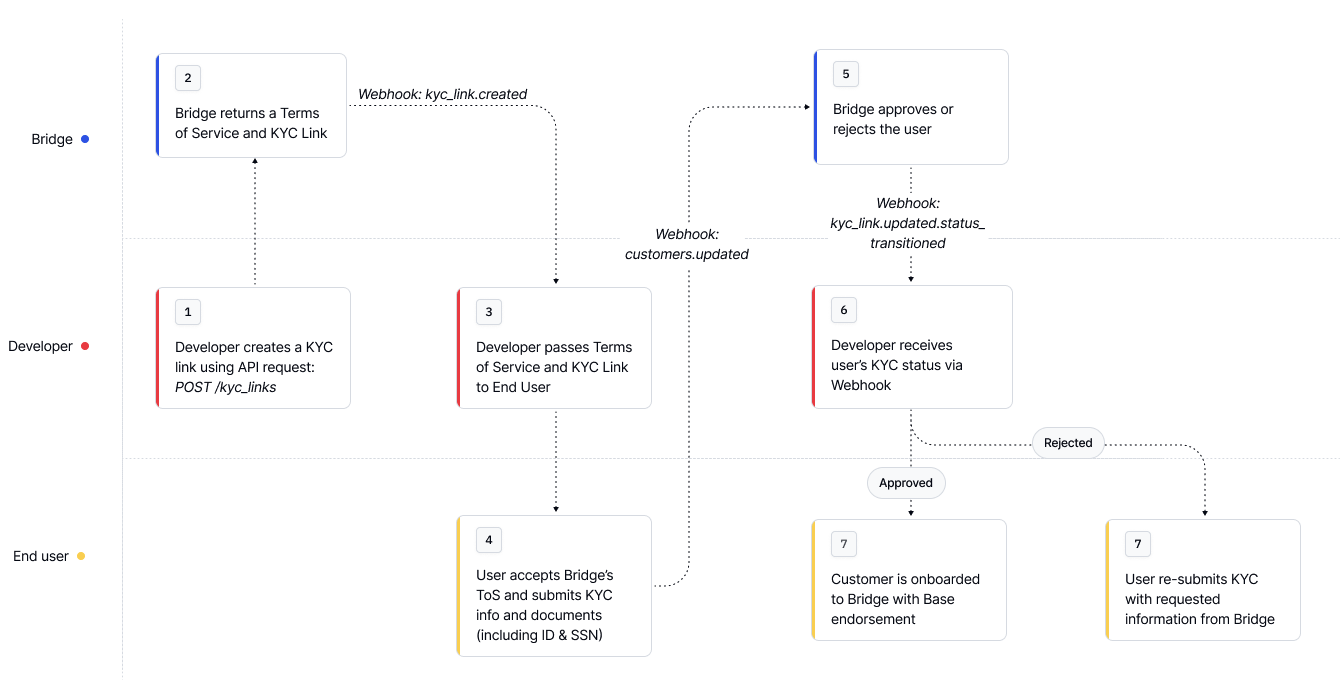
Step 1: Create a KYC Link
Use the /kyc_links endpoint to generate links for TOS acceptance and KYC verification
curl --location --request POST 'https://api.bridge.xyz/v0/kyc_links' \
--header 'Content-Type: application/json' \
--header 'Api-Key: <API Key>' \
--header 'Idempotency-Key: <generate a uuid>' \
--data-raw '{
  "full_name": "John Doe",
  "email": "[email protected]",
  "type": "individual"
}'
Response:
{
  "id": "uuid",
  "full_name": "John Doe",
  "email": "[email protected]",
  "type": "individual", // or "business"
  "kyc_link": "https://bridge.withpersona.com/verify?",
  "tos_link": "https://dashboard.bridge.xyz/accept-terms-of-service?",
  "kyc_status": "not_started", // or "under_review", "incomplete", "approved" or "rejected"
  "rejection_reasons": [],
  "tos_status": "pending", // or "approved"
  "created_at": "2025-07-16T18:28:25.970Z",
  "customer_id": "customer_id",
  "persona_inquiry_type": "gov_id_db"
}
Step 2: Share the Links with Your Customer
Guide the user through:
- Visiting the
tos_linkand accepting terms of service - Completing identity verification via the
kyc_link
This process typically takes less than a minute and updates automatically once complete.
👉 More about KYC Links here: KYC Links for New Customers
Method 2: Direct API Integration (More Control)
Prefer to control the onboarding UI? You can collect and submit customer data directly to Bridge.
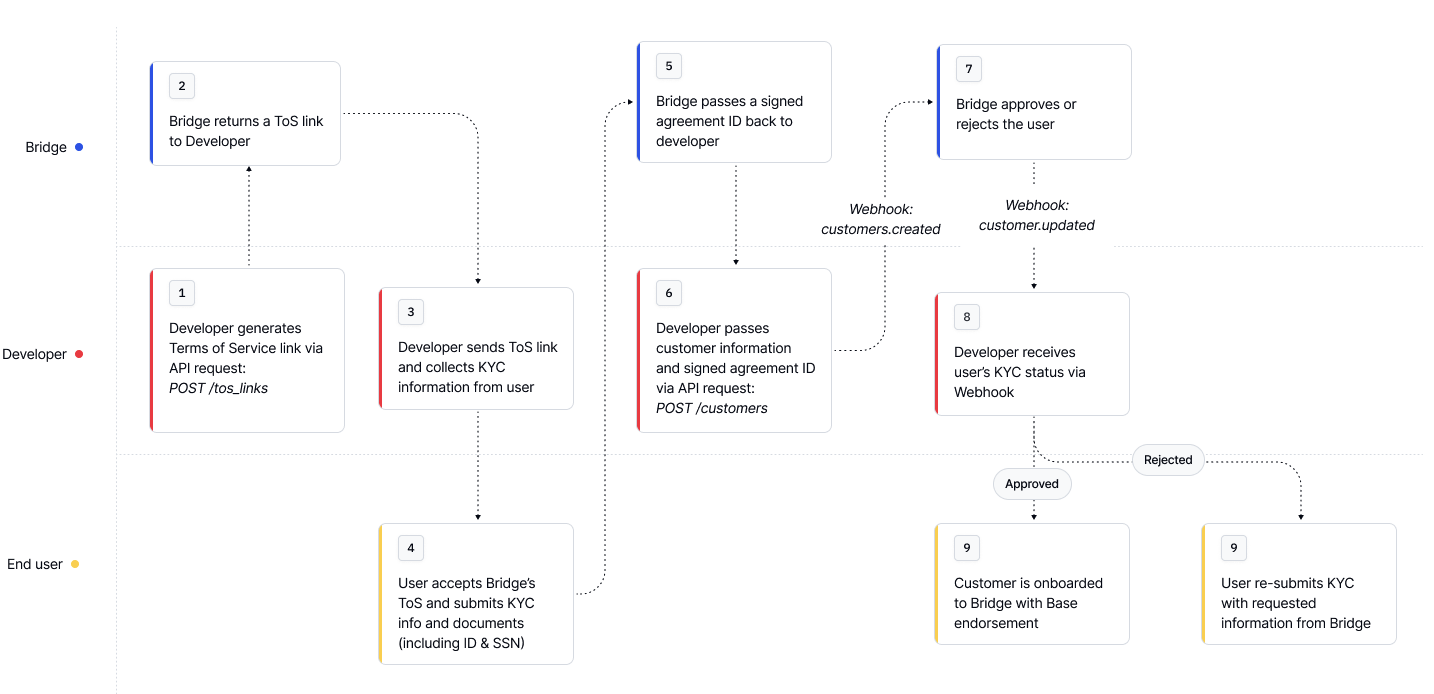
Step 1: Create an Individual Customer Using API
Create U.S. based customer:
curl --location --request POST 'https://api.bridge.xyz/v0/customers' \
--header 'Content-Type: application/json' \
--header 'Api-Key: <API Key>' \
--header 'Idempotency-Key: <generate a uuid>' \
--data-raw '{
  "type": "individual",
  "first_name": "John",
  "last_name": "Doe",
  "email": "[email protected]",
  "residential_address": {
    "street_line_1": "123 Main St",
    "city": "New York City",
    "subdivision": "New York",
    "postal_code": "10001",
    "country": "USA"
  },
  "birth_date": "2007-01-01",
  "signed_agreement_id": "d536a227-06d3-4de1-acd3-8b5131730480",
  "identifying_information": [
    {
      "type": "ssn",
      "issuing_country": "usa",
      "number": "xxx-xx-xxxx"
    },
    {
      "type": "drivers_license",
      "issuing_country": "usa",
      "number": "xxxxxxxxxxxxx",
      "image_front": "data:image/jpg;base64,...",
      "image_back": "data:image/jpg;base64,..."
    }
  ]
}
👉 For business customers or international onboarding, see the Customers documentation.
Step 2: Customer Endorsements: Enabling Transacting
A customer endorsement activates a customer to use a specific payment rail. Most flows automatically request a "base" endorsement when creating a customer.
Endorsements represent an approval of a customer to onboard and transact with Bridge. To onboard a customer and enable them to take actions on Bridge, the customer must provide their KYC information and accept the terms of service for the required endorsement type.
Checking Customer Endorsement Status
curl --request GET \
     --url https://api.bridge.xyz/v0/customers/{customerID} \
     --header 'accept: application/json'
✅ Example of an approved customer
{
 	id: '1',
  ...
  endorsements: [
    {
      name: 'base',
      status: 'approved',
      additionalRequirements: [],
      requirements: {
        complete: [
            "first_name",
            "last_name",
            "tax_identification_number",
            "email_address",
            "date_of_birth",
            "accepted_risk_region",
          	"address_of_residence",
						"terms_of_service_v1"
				],
        pending: [],
        missing: null,
        issues: [],
      },
    },
  ],
}
⚠️ Example of an incomplete customer
{
  "id": "cust_1",
  ...
  "endorsements": [
    {
      "name": "base",
      "status": "incomplete",
      "requirements": {
          "complete": [
            "first_name",
            "last_name",
            "tax_identification_number",
            "email_address",
            "date_of_birth",
            "accepted_risk_region",
            "address_of_residence"
          ],
          "pending": [],
          "missing": {
            "all_of": [
              "terms_of_service_v1",
              "sanctions_screen"
            ]
          },
          "issues": []
      },
    },
  ]
}
👉 Learn more about endorsements here: Endorsements
What's next?
After creating your first customer:
- Test the complete flow in your development environment
- Handle edge cases like rejections and additional requirements
- For detailed rejection reasons, see the Rejection Reasons
- To increase customer limits, see the Additional Requirements for Existing Customers
- Set up webhooks to receive real-time status updates for customers
- See Setting up webhooks for setting up your first webhook
- Review security practices to protect customer data
Updated about 3 hours ago