
Create a one-time payment
This guide will walk you through sending a one-time payment using Bridge's Transfer API. For this example, we'll be creating a one time payment from USD to USDC. With the Transfer API, you convert from any supported fiat currency to and from any supported crypto chain/currency. You can also use the Transfer API to take recurring payments.
Prerequisites
Before you begin, ensure you have:
- A Bridge account with API access
- Your API key (keep this secure!)
- At least one verified customer - see Create your first customer.
- Basic understanding of REST APIs
- Development environment set up
Understanding Bridge Transfers
Bridge transfers enable conversion between fiat and crypto across supported currencies and rails. There are three primary transfer types:
- Fiat → Crypto (aka onramps): Convert traditional fiat currency to cryptocurrency
- Crypto → Crypto: Exchange between different cryptocurrencies
- Crypto → Fiat (aka offramps): Convert cryptocurrency to traditional fiat currency
Here are the key concepts to a transfer:
- Source: Origin of funds (Bridge wallet, customer crypto wallet, bank account)
- Destination: Endpoint for funds transfer
- On Behalf Of: Customer identifier for compliance
- Amount: Transfer amount (can be flexible)
Transfer Flow
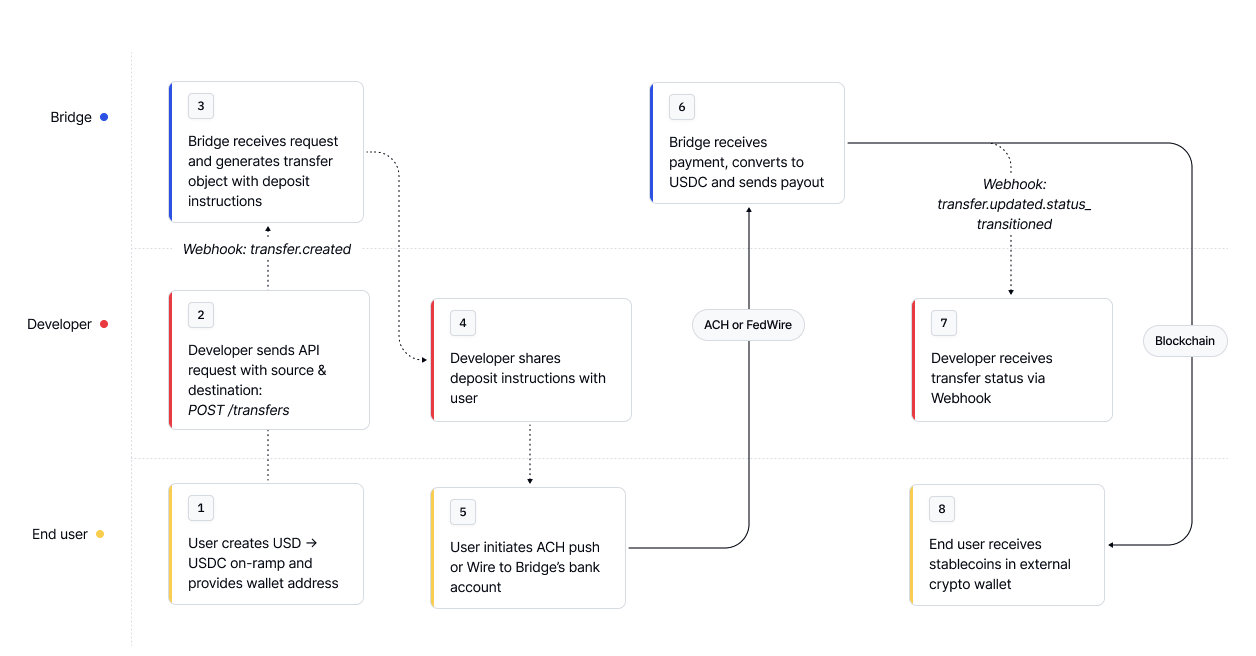
For detailed information, see Transfers.
Step 1: Create a transfer
Let's create a transfer for an onramp from a USD ACH deposit to a USDC Ethereum address.
curl --location --request POST 'https://api.bridge.xyz/v0/transfers' \
--header 'Api-Key: <API Key>' \
--header 'Idempotency-Key: <Unique Idempotency Key>' \
--data-raw '{
  "on_behalf_of": "cust_alice",
  "source": {
    "payment_rail": "ach_push",
    "currency": "usd",
  },
  "destination": {
    "payment_rail": "ethereum",
    "currency": "usdc",
    "to_address": "0xdeadbeef",
  },
  "features": {
		"flexible_amount": true // allows for any deposit amount
  }
}'
Example response
{
  "id": "transfer_123",
  "state": "awaiting_funds",
  "on_behalf_of": "cust_alice",
  "source": {
    "payment_rail": "ach_push",
    "currency": "usd"
  },
  "destination": {
    "payment_rail": "ethereum",
    "currency": "usdc",
    "to_address": "0xdeadbeef"
  },
  "source_deposit_instructions": {
    "payment_rails": ["ach_push","wire"],
    "currency": "ach",
    "deposit_message": "BRGEXAMPLEMEMO",
		"currency": "usd",
    "bank_beneficiary_name": "Test Beneficiary",
    "bank_routing_number": "123456789",
    "bank_account_number": "987654321",
    "bank_name": "Test Bank"
  },
 "features": {
    "flexible_amount": true
  },
  "created_at": "2023-05-05T19:39:14.316Z",
  "updated_at": "2023-05-05T19:39:15.231Z"
}
You can share the source deposit instructions with your customer. Your customer will then need to initiate an ACH deposit with:
- the destination routing number:
987654321 - the destination account number:
987654321 - with the a deposit message as:
BRGEXAMPLEMEMO
Once Bridge receives these funds, we'll look for the deposit message to find the payment.
Step 2: Monitor Transfer Status
Transfer states
When Bridge receives the deposit, we'll transition the transfer state to funds_received. From there, you can monitor the state until it's finally delivered. The transfer status when it's delivered is payment_processed. You can view the full breakdown of transfer states at Transfers.
Fetching Transfers status via API
You can use the Get a transfer endpoint to fetch the latest Transfer status.
curl --request GET \
     --url 'https://api.bridge.xyz/v0/transfer_123' \
     --header 'accept: application/json'
Funds received example
{
  "count": 2,
  "data": [
    {
      "summary": "A successful onramp transfer object",
      "value": {
        "id": "transfer_456",
        "client_reference_id": "client_transfer_id_456",
        "state": "funds_received", // transfer state
        "on_behalf_of": "cust_alice",
        "amount": "500.25",
        "developer_fee": "0.0",
        "source": {
          "payment_rail": "ach",
          "currency": "usd",
          "external_account_id": "ext_123"
        },
        "destination": {
          "payment_rail": "ethereum",
          "currency": "usdc",
          "to_address": "0x71C7656EC7ab88b098defB751B7401B5f6d8976F"
        },
        "receipt": {
          "initial_amount": "500.25",
          "developer_fee": "0.0",
          "exchange_fee": "0.0",
          "subtotal_amount": "500.25",
          "gas_fee": "0.0",
          "final_amount": "500.25",
          "destination_tx_hash": "0xdeadbeef",
          "url": "https://dashboard.bridge.xyz/transaction/00000000-0000-0000-0000-000000000000/receipt/00000000-0000-0000-0000-000000000000"
        },
        "created_at": "2020-01-02T00:00:00.000Z",
        "updated_at": "2020-01-03T00:00:00.000Z"
      }
    }
  ]
}
{
  "count": 2,
  "data": [
    {
      "summary": "A successful onramp transfer object",
      "value": {
        "id": "transfer_456",
        "client_reference_id": "client_transfer_id_456",
        "state": "payment_processed", // transfer state
        "on_behalf_of": "cust_alice",
        "amount": "500.25",
        "developer_fee": "0.0",
        "source": {
          "payment_rail": "ach",
          "currency": "usd",
          "external_account_id": "ext_123"
        },
        "destination": {
          "payment_rail": "ethereum",
          "currency": "usdc",
          "to_address": "0x71C7656EC7ab88b098defB751B7401B5f6d8976F"
        },
        "receipt": {
          "initial_amount": "500.25",
          "developer_fee": "0.0",
          "exchange_fee": "0.0",
          "subtotal_amount": "500.25",
          "gas_fee": "0.0",
          "final_amount": "500.25",
          "destination_tx_hash": "0xdeadbeef",
          "url": "https://dashboard.bridge.xyz/transaction/00000000-0000-0000-0000-000000000000/receipt/00000000-0000-0000-0000-000000000000"
        },
        "created_at": "2020-01-02T00:00:00.000Z",
        "updated_at": "2020-01-03T00:00:00.000Z"
      }
    }
  ]
}
Advanced: Monitoring using webhooks
You can set up webhooks to receive real-time notifications about transfer status changes. See guide for more details on setting up webhooks.
Example transfer webhook: payment_processed
{
  "api_version": "v0",
  "event_id": "wh_t8TAhPPYrRV2v8Asi9ed3sw",
  "event_developer_id": "371983-uery-1238-1238971",
  "event_category": "transfer",
  "event_type": "updated.status_transitioned",
  "event_object_id": "fecffc8b-ed5e-48ae-bd24-b36268330b32",
  "event_object_status": "payment_processed",
  "event_object": {
    "id": "transfer_abc123",
    "state": "payment_processed",
    "amount": "50.0",
    "currency": "usd",
    "developer_fee": "0.0",
    "client_reference_id": null,
    "on_behalf_of": "cust_alice",
    "source": {
      "currency": "usdb",
      "payment_rail": "bridge_wallet",
      "bridge_wallet_id": "wallet_alice_usdb"
    },
    "destination": {
      "currency": "usdb",
      "payment_rail": "solana",
      "to_address": "9uYxZmV1KxJn7oVPW6bLUhF3cGQsk8vvMf1sQdPE6K4"
    },
    "receipt": {
      "url": "https://dashboard.bridge.xyz/transaction/transfer_abc123/receipt/receipt_xyz456",
      "gas_fee": "0.0",
      "exchange_fee": "0.0",
      "developer_fee": "0.0",
      "initial_amount": "50.0",
      "subtotal_amount": "50.0",
      "final_amount": "50.0",
      "destination_tx_hash": "3gJH6oXpZUNgC1QLh8mXNPF92LtLKzHZj5eHuQrdQAgB"
    },
    "created_at": "2025-07-15T23:55:39.411Z",
    "updated_at": "2025-07-15T23:55:58.645Z"
  },
  "event_object_changes": {
    "state": [ "payment_submitted", "payment_processed" ]
  },
  "event_created_at": "2024-02-01T04:32:28.978Z"
}
Best Practices
- Clear Instructions: Provide customers with clear, step-by-step deposit instructions, including deposit messages
- Error Handling: Plan for various failure scenarios and customer communication
- Testing: Always test with small amounts before processing larger transfers
Next Steps
After successfully creating your first static template:
- Implement Webhook Processing: Set up comprehensive webhook handling for all transfer events
- Customer Communication: Build flows to notify customers of transfer status changes
- Error Recovery: Implement processes to handle failed transfers
Additional Resources
Updated about 3 hours ago