This guide will walk you through sending a one-time payment using Bridge’s Transfer API.

Transfer API

The Transfer API enable conversion between fiat and crypto across supported currencies and rails. There are three primary transfer types:
  • Fiat → Crypto (aka onramps): Convert traditional fiat currency to cryptocurrency
  • Crypto → Crypto: Exchange between different cryptocurrencies
  • Crypto → Fiat (aka offramps): Convert cryptocurrency to traditional fiat currency
Here are the key concepts to a transfer:
  • Source: Origin of funds (Bridge wallet, customer crypto wallet, bank account)
  • Destination: Endpoint for funds transfer
  • On Behalf Of: Customer identifier for compliance
  • Amount: Transfer amount (can be flexible)

Transfer Flow

For detailed information, see Transfers.

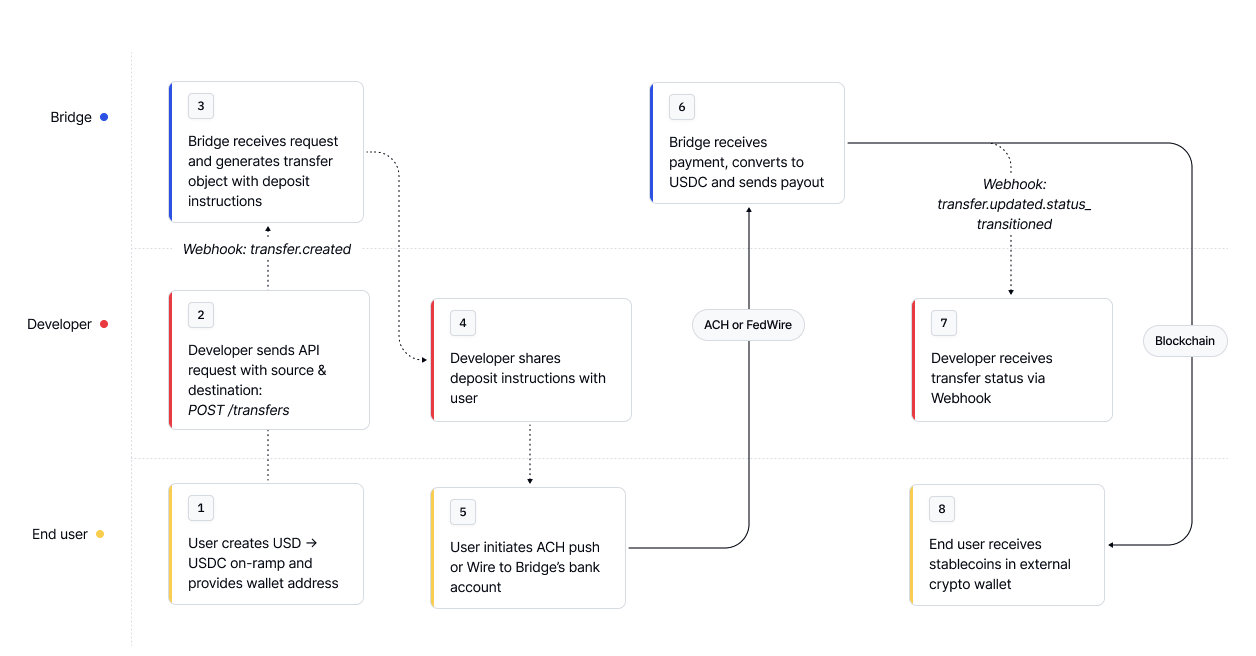
Step 1: Create a transfer

Let’s create a transfer for an onramp from a USD ACH deposit to a USDC Ethereum address.
Request
curl --location --request POST 'https://api.bridge.xyz/v0/transfers' \
--header 'Api-Key: <API Key>' \
--header 'Idempotency-Key: <Unique Idempotency Key>' \
--data-raw '{
  "on_behalf_of": "cust_alice",
  "source": {
    "payment_rail": "ach_push",
    "currency": "usd",
  },
  "destination": {
    "payment_rail": "ethereum",
    "currency": "usdc",
    "to_address": "0xdeadbeef",
  },
  "features": {
		"flexible_amount": true // allows for any deposit amount
  }
}'
Response
{
  "id": "transfer_123",
  "state": "awaiting_funds",
  "on_behalf_of": "cust_alice",
  "source": {
    "payment_rail": "ach_push",
    "currency": "usd"
  },
  "destination": {
    "payment_rail": "ethereum",
    "currency": "usdc",
    "to_address": "0xdeadbeef"
  },
  "source_deposit_instructions": {
    "payment_rails": ["ach_push","wire"],
    "currency": "usd",
    "deposit_message": "BRGEXAMPLEMEMO",
	"currency": "usd",
    "bank_beneficiary_name": "Test Beneficiary",
    "bank_routing_number": "123456789",
    "bank_account_number": "987654321",
    "bank_name": "Test Bank"
  },
 "features": {
    "flexible_amount": true
  },
  "created_at": "2023-05-05T19:39:14.316Z",
  "updated_at": "2023-05-05T19:39:15.231Z"
}
You can share the source deposit instructions with your customer. Your customer will then need to initiate an ACH deposit with:
  • the source deposit routing number: 123456789
  • the source deposit account number: 987654321
  • with the a deposit message as: BRGEXAMPLEMEMO
Once Bridge receives these funds, we’ll look for the deposit message to find the payment.

Step 2: Monitor Transfer Status

When Bridge receives the deposit, we’ll transition the transfer state to funds_received. The transfer status when it’s delivered is payment_processed. You can pull the transfer status from the API or listen to webhooks to watch the transfer transition. View the full breakdown of transfer states here.

Fetching Transfers status via API

You can use the Get a transfer endpoint to fetch the latest Transfer status.
Request
curl --request GET \
     --url 'https://api.bridge.xyz/v0/transfer_123' \
     --header 'accept: application/json'
Response
{
  "count": 2,
  "data": [
    {
      "summary": "A successful onramp transfer object",
      "value": {
        "id": "transfer_456",
        "client_reference_id": "client_transfer_id_456",
        "state": "funds_received", // transfer state
        "on_behalf_of": "cust_alice",
        "amount": "500.25",
        "developer_fee": "0.0",
        "source": {
          "payment_rail": "ach",
          "currency": "usd",
          "external_account_id": "ext_123"
        },
        "destination": {
          "payment_rail": "ethereum",
          "currency": "usdc",
          "to_address": "0x71C7656EC7ab88b098defB751B7401B5f6d8976F"
        },
        "receipt": {
          "initial_amount": "500.25",
          "developer_fee": "0.0",
          "exchange_fee": "0.0",
          "subtotal_amount": "500.25",
          "gas_fee": "0.0",
          "final_amount": "500.25",
          "destination_tx_hash": "0xdeadbeef",
          "url": "https://dashboard.bridge.xyz/transaction/00000000-0000-0000-0000-000000000000/receipt/00000000-0000-0000-0000-000000000000"
        },
        "created_at": "2020-01-02T00:00:00.000Z",
        "updated_at": "2020-01-03T00:00:00.000Z"
      }
    }
  ]
}

Advanced: Monitoring using webhooks

You can set up webhooks to receive real-time notifications about transfer status changes. See guide for more details on setting up webhooks.
Example webhook: payment_processed
{
  "api_version": "v0",
  "event_id": "wh_t8TAhPPYrRV2v8Asi9ed3sw",
  "event_developer_id": "371983-uery-1238-1238971",
  "event_category": "transfer",
  "event_type": "updated.status_transitioned",
  "event_object_id": "fecffc8b-ed5e-48ae-bd24-b36268330b32",
  "event_object_status": "payment_processed",
  "event_object": {
    "id": "transfer_abc123",
    "state": "payment_processed",
    "amount": "50.0",
    "currency": "usd",
    "developer_fee": "0.0",
    "client_reference_id": null,
    "on_behalf_of": "cust_alice",
    "source": {
      "currency": "usdb",
      "payment_rail": "bridge_wallet",
      "bridge_wallet_id": "wallet_alice_usdb"
    },
    "destination": {
      "currency": "usdb",
      "payment_rail": "solana",
      "to_address": "9uYxZmV1KxJn7oVPW6bLUhF3cGQsk8vvMf1sQdPE6K4"
    },
    "receipt": {
      "url": "https://dashboard.bridge.xyz/transaction/transfer_abc123/receipt/receipt_xyz456",
      "gas_fee": "0.0",
      "exchange_fee": "0.0",
      "developer_fee": "0.0",
      "initial_amount": "50.0",
      "subtotal_amount": "50.0",
      "final_amount": "50.0",
      "destination_tx_hash": "3gJH6oXpZUNgC1QLh8mXNPF92LtLKzHZj5eHuQrdQAgB"
    },
    "created_at": "2025-07-15T23:55:39.411Z",
    "updated_at": "2025-07-15T23:55:58.645Z"
  },
  "event_object_changes": {
    "state": [ "payment_submitted", "payment_processed" ]
  },
  "event_created_at": "2024-02-01T04:32:28.978Z"
}

Best Practices

  1. Clear Instructions: Provide customers with clear, step-by-step deposit instructions, including deposit messages
  2. Error Handling: Plan for various failure scenarios and customer communication
  3. Testing: Always test with small amounts before processing larger transfers

Next Steps

After successfully creating your first transfer:
  1. Implement Webhook Processing: Set up comprehensive webhook handling for all transfer events
  2. Customer Communication: Build flows to notify customers of transfer status changes
  3. Error Recovery: Implement processes to handle failed transfers

Additional Resources