> ## Documentation Index
> Fetch the complete documentation index at: https://apidocs.bridge.xyz/llms.txt
> Use this file to discover all available pages before exploring further.
# Onboard your first customer
Bridge customers represent users of your business who can send and receive money. There are two types:
* **Individual customers**: Personal users with personal information
* **Business customers**: Companies with business information and beneficial owners
### Key Terms
* **KYC (Know Your Customer)**: Identity verification process required for compliance
* **Endorsements**: Approval for specific payment rails (USD, EUR, MXN)
* **Terms of Service**: Legal agreement customers must accept
***
## Method 1: Using KYC Links (Quick Start - Recommended)
Bridge provides a **hosted onboarding flows** so you don’t have to build your own KYC UI. This is the fastest way to onboard customers.
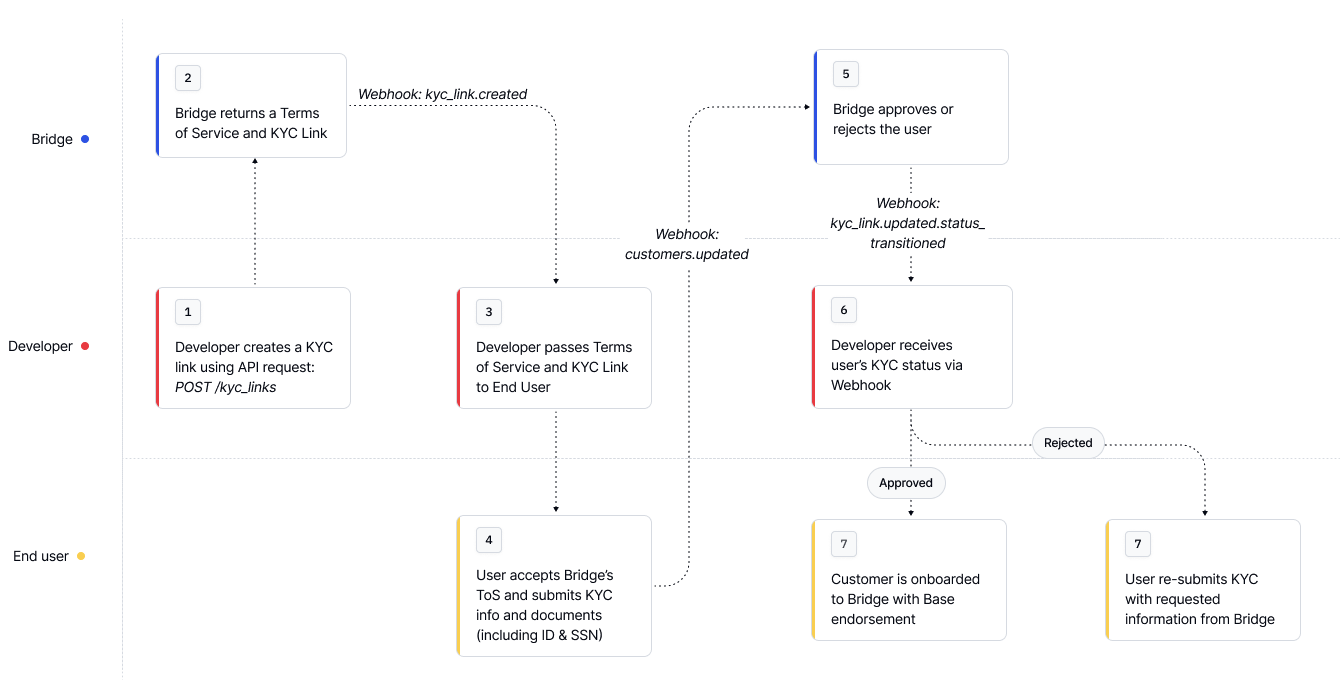
Use the `/kyc_links` endpoint to generate links for TOS acceptance and KYC verification
```bash Request expandable theme={null}
curl --location --request POST 'https://api.bridge.xyz/v0/kyc_links' \
--header 'Content-Type: application/json' \
--header 'Api-Key: ' \
--header 'Idempotency-Key: ' \
--data-raw '{
"full_name": "John Doe",
"email": "johndoe@example.com",
"type": "individual"
}'
```
```json Response expandable theme={null}
{
"id": "uuid",
"full_name": "John Doe",
"email": "johndoe@example.com",
"type": "individual", // or "business"
"kyc_link": "https://bridge.withpersona.com/verify?",
"tos_link": "https://dashboard.bridge.xyz/accept-terms-of-service?",
"kyc_status": "not_started", // or "under_review", "incomplete", "approved" or "rejected"
"rejection_reasons": [],
"tos_status": "pending", // or "approved"
"created_at": "2025-07-16T18:28:25.970Z",
"customer_id": "customer_id",
"persona_inquiry_type": "gov_id_db"
}
```
Guide the user through:
1. Visiting the `tos_link` and accepting terms of service
2. Completing identity verification via the `kyc_link`
This process typically takes less than a minute and updates automatically once complete.
More about KYC Links here: [KYC Links for New Customers](/platform/customers/customers/kyclinks)
## Method 2: Direct API Integration (More Control)
Prefer to control the onboarding UI? You can collect and submit customer data directly to Bridge.
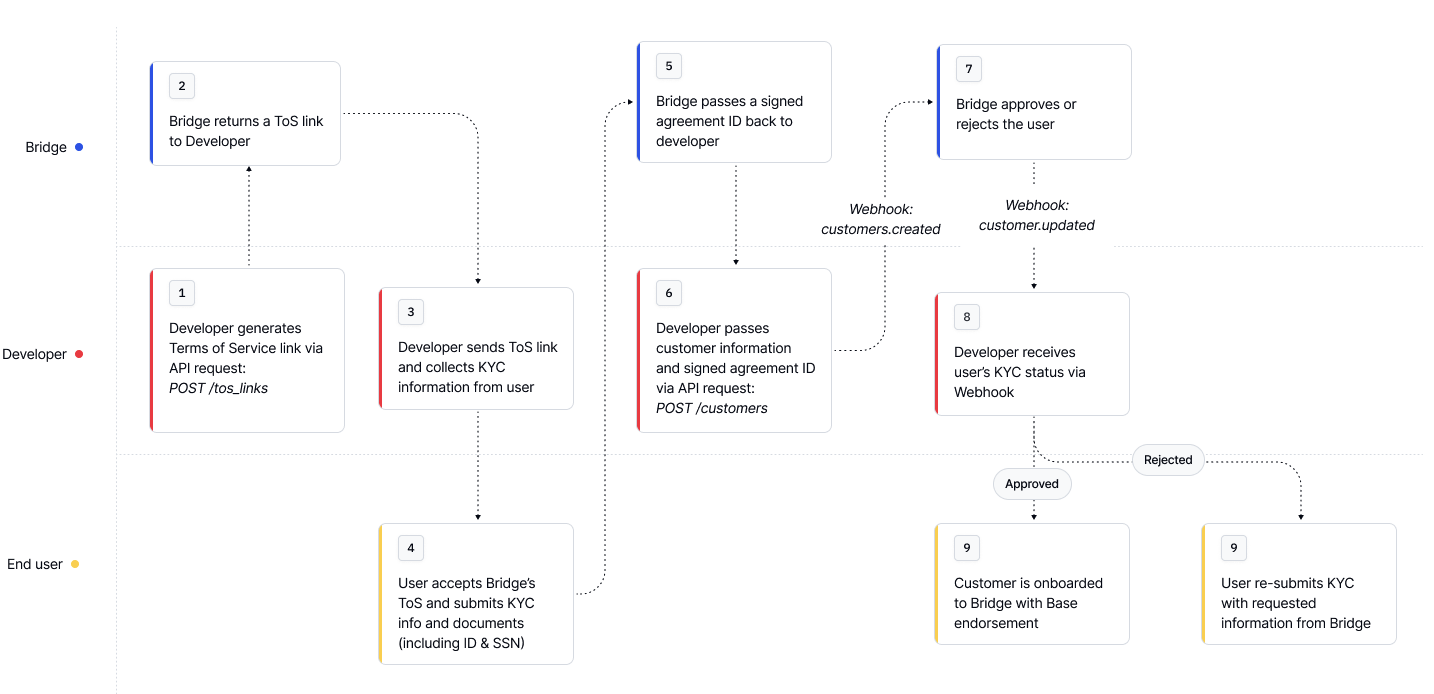
Create U.S. based customer:
```bash Request expandable theme={null}
curl --location --request POST 'https://api.bridge.xyz/v0/customers' \
--header 'Content-Type: application/json' \
--header 'Api-Key: ' \
--header 'Idempotency-Key: ' \
--data-raw '{
"type": "individual",
"first_name": "John",
"last_name": "Doe",
"email": "email@example.com",
"residential_address": {
"street_line_1": "123 Main St",
"city": "New York City",
"subdivision": "New York",
"postal_code": "10001",
"country": "USA"
},
"birth_date": "2007-01-01",
"signed_agreement_id": "d536a227-06d3-4de1-acd3-8b5131730480",
"identifying_information": [
{
"type": "ssn",
"issuing_country": "usa",
"number": "xxx-xx-xxxx"
},
{
"type": "drivers_license",
"issuing_country": "usa",
"number": "xxxxxxxxxxxxx",
"image_front": "data:image/jpg;base64,...",
"image_back": "data:image/jpg;base64,..."
}
]
}
```
A customer endorsement activates a customer to use a specific payment rail. Most flows automatically request a "base" endorsement when creating a customer.
Endorsements represent an approval of a customer to onboard and transact with Bridge. To onboard a customer and enable them to take actions on Bridge, the customer must provide their KYC information and accept the terms of service for the required endorsement type.
## Checking Customer Endorsement Status
```bash Request expandable theme={null}
curl --request GET \
--url https://api.bridge.xyz/v0/customers/{customerID} \
--header 'accept: application/json'
```
Example of an approved customer
```json Response expandable theme={null}
{
"id": '1',
...
"endorsements": [
{
"name": "base",
"status": "approved",
"additionalRequirements": [],
"requirements": {
"complete": [
"first_name",
"last_name",
"tax_identification_number",
"email_address",
"date_of_birth",
"accepted_risk_region",
"address_of_residence",
"terms_of_service_v1"
],
"pending": [],
"missing": null,
"issues": [],
},
},
],
}
```
Example of an incomplete customer
```json expandable theme={null}
{
"id": "cust_1",
...
"endorsements": [
{
"name": "base",
"status": "incomplete",
"requirements": {
"complete": [
"first_name",
"last_name",
"tax_identification_number",
"email_address",
"date_of_birth",
"accepted_risk_region",
"address_of_residence"
],
"pending": [],
"missing": {
"all_of": [
"terms_of_service_v1",
"sanctions_screen"
]
},
"issues": []
},
},
]
}
```
Learn more about endorsements here: [Endorsements](/platform/customers/customers/endorsements)
## What's next?
After creating your first customer:
1. **Test the complete flow** in your development environment
2. **Handle edge cases** like rejections and additional requirements
1. For detailed rejection reasons, see the [Rejection Reasons](/platform/customers/customers/rejection_reasons)
2. To increase customer limits, see the [Additional Requirements for Existing Customers](/platform/customers/customers/add_req)
3. **Set up webhooks** to receive real-time status updates for customers
1. See [Setting up webhooks](/get-started/introduction/quick-start/setting-up-webhooks) for setting up your first webhook
4. **Review security practices** to protect customer data
Learn more at [Customers](/platform/customers/overview).